

Drupal 8 Editing Tips - SuperUser
Drupal 7 to Drupal 8 Differences
The Drupal 8 editing interfaces vary a bit from those in Drupal 7. While many of the processes will stay the same, there are some key differences for the BSOS College.
Creating a User Account
When creating a user, a few more fields are visible in Drupal 8. It is required that 6 settings are completed, including the following:
- Email Address: This is the email address that the system will store for communication with the user, and must be unique within the site.
- Username: The Username is the user's LDAP/CAS Directory ID, and must match the CAS Username for campus login.
- Password/Confirm Password: These password fields are not used in the system, but are a default on the Drupal Add User screen. Just enter any text, twice.
- Roles: Select the desired Roles that provide site permissions to the user. Please remember that one of the following 3 roles is required:
- Faculty
- Staff
- Graduate Student
- CAS Username: The CAS Username must match the user's campus LDAP/CAS Directory ID, and must match the Username above.
If you see any other options, they are not used and can safely be ignored.
Adding a Landing Topic to the Main Menu
The Main Menu can now contain drop-down items that point to the next-level Landing Topics. For example, suppose that the About us landing page has a landing topic called Overview. The Main Menu then could have a drop-down from About Us that lists the item "Overview" and links directly to that landing topic.
Users with the overarching Department Web Editor role can add Landing Topics to the site. When doing so, add the item to the dropdown in the Main Menu when editing the Landing Topic. A Department Web Editor should see a Menu Settings tab at the bottom of the Landing Topic -- when editing a Landing Topic. Edit the following details within the Menu Settings: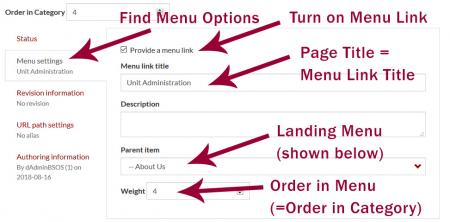
- Provide a menu link: Check "on"
- Menu Link Title: Copy the Landing Topic's title and paste into the Menu Link Title field
- Parent Item: Find the <Main Menu> item within the drop-down list, then select the related Landing Page name (e.g. "About Us")
- Weight: Enter the numerical order where this Landing Topic appears. Example: For a landing topic called "Overview" that appears first on the About Us landing page, the Weight would be 1.
Using Paragraphs
Drupal has a relatively new construct called "Paragraphs". Unfortunately, the name is not self-explanatory. Paragraphs provide a way for the end-user to add varying amounts of content, in predefined formats.
For example, every user can add any number of Degrees to their Profile. The Degrees paragraph is set up with Degree Type and Degree Details fields. Since it is set up as a Paragraph, the end-user has control of how many are entered and the order in which they are shown.
A superuser may be able to edit a Page containing a Page Element paragraph type. This paragraph allows the user to select a column format as well as the type of content to go into each space. (Note that this replaces the Panelizer that was used in Drupal 7) Below the Body field is a field called Page Element. It includes the following options:
|
|
Options like Add Columns (two uneven) bring up a dropdown option to select the ratio of the columns on the display. For example, 3/4 - 1/4 is wider on the left than on the right, while the opposite is true of 1/4 - 3/4. Within that Page Element, select the Column Content to add. For two columns, the first selected Column Content will appear in the first column, while the second-added Column Content will appear in the second column. Add the desired content within each WYSIWYG box or given Paragraph option.
Image Crop (e.g. Featured image, Landing Topic image, etc.)
Some website images have displays that are cropped to a certain ratio. For example, the Featured Content image is cropped at a ratio of 4:3. Cropping is applied in specific views of the image.
Images added via an Image field may have the Crop Image link. This applies only to the Image field and not to images added manually in the WYSIWYG editor. Click the Crop Image link to see how the image is cropped. The default is to crop the image in the center but this may not be the ideal cropping for the given image.


To change which portion of the image is displayed, select the Crop Image link. The full-size image will then appear on the screen with a selectable cropping box. [See image at left or preceding this text] The cropping box itself can be dragged within the image, as well as resized using the edge handles (the dots at each corner and in the middle of each side).
Set the crop to the portion of the image to be highlighted. Note the difference between the lighter colored blue part - the cropping area - of the graduate pictures shown.
After setting the crop window, continue to edit the rest of the page, then Save to save the page settings.
Working with Files
Deleting Files
When trying to delete a file, the error "File is in use by another application" may appear. That means that the file cannot be deleted because it is assigned to some content. Consider if a revision of a content item could be the culprit. For example, a previous revision of a current Course Instance could have an old syllabus file.
Uploading Files
Fields specified for files of a specific type, such as an image or file, are uploaded to the server for display. The Open File Browser is the reliable way to upload files. This link will display the files uploaded to the server, and allow the user to select an existing file or upload a new file to select. [Note that the Browse.. button may or may not work - use the Open File Browser link]
Saving Files
When saving files, it is best practice to include only letters, numbers, and underscores (_). Technically, URLs are not valid if they contain spaces -- and that includes links to files. Please notify OACS if your site contains files with spaces in names with broken links. OACS may be able to help correct the broken links.
Note for Superusers:
Creating Profiles for Other Users
When creating a Faculty/Staff Profile or Graduate Student Profile for another user, set the Profile Owner and Author fields to the given user (not yourself). This will allow the given user to edit their own profile in the future. Superusers with profile editing rights will continue to be able to edit other users' profiles.
Adding Relative Links
When linking to another page or document on the current website, it is best to make a relative link instead of an absolute link.
- Absolute link: https://bsos.umd.edu/faculty-staff/drupal-8-editing-tips
- Relative link: /faculty-staff/drupal-8-editing-tips
Compare the examples and note that the relative link is just a part of the absolute link. Beginning with the slash character "/" tells systems that the information is nearby. An absolute link, on the other hand, implies that the information is elsewhere on the web and can cause the web browser to begin its search for information outside of the current website.
Using relative links helps the system stay up to date, in case the website is moved in any way, and helps make finding local information quicker.